How to Clean Up Your Storage Space
If you have possessions that you have placed in a storage space, you can rest assured that your items are safe and secure. But, after several months or even years of your stuff being in storage, you may not realize that your possessions can get covered with dust and debris.
Also, you may simply forget all that you have stored, which means that there may be things that are out of date or you simply do not need or want anymore. If you have rented a storage space, and you haven’t gone through all your items in a while, it may be time to clean out and reorganize your space.
Now, is a great time to clean out your storage space, and give it a deep clean. Read further on how you can disinfect your storage space with our expert tips.
First Step: Decluttering to clean up your storage space
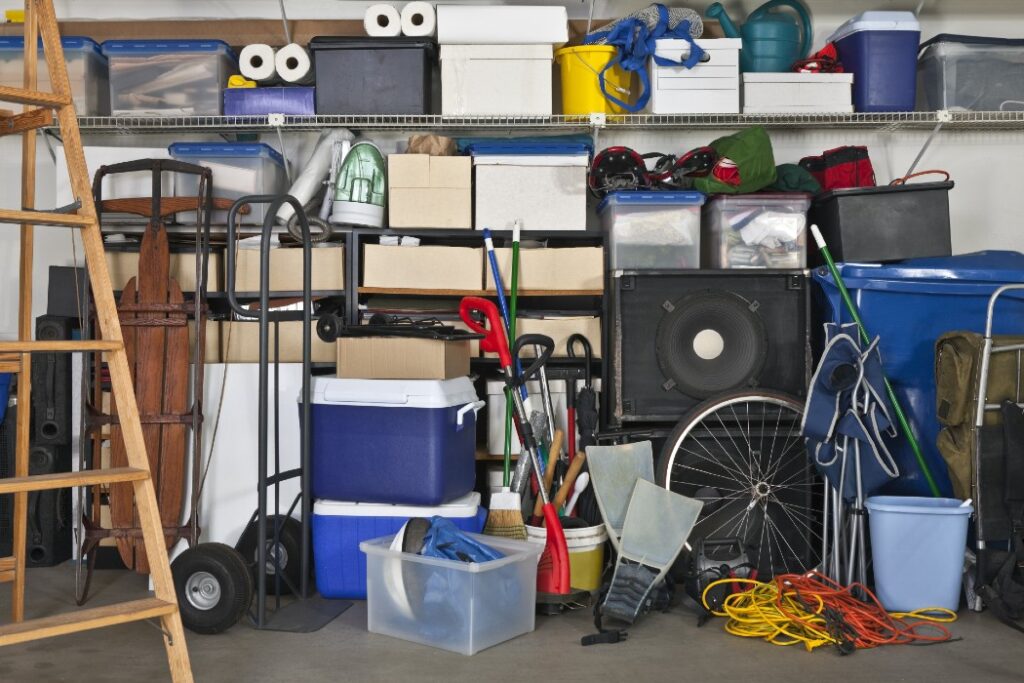
This is going to be a big job. In order to truly declutter your storage space, you will have to take out all of your items, and place them outside the unit. Next, you will have to go through every box and storage container to ascertain what items you have stored.
Then, after you catalog all the items, you can divide your possessions into categories to help you stay organized. There should be four different piles for the four different categories, which are; keep, sell, donate, and recycle.
Take a detailed inventory of your belongings as you put them into one of the four categories mentioned above. Yes, this may take a while, but it is worth it, in the end, to help you stay organized.
Examine your clothing, and decide what to keep and what to donate. If your seasonal clothing smells musty, take them home to wash before restoring it. This ensures that they will be ready to go the next time that you need them. Look for the presence of mold or mildew, or insect damage on your items as well. These items should be removed from the unit and either thrown away or cleaned before being put back in. You can recycle old electronics at specified centers.
After you are done purging, you will need to keep your belongings outside of the unit while you deep clean. To stay organized, you should have your cleaning supplies ready to go.
Second Step: Deep Cleaning Your Storage Unit
This may take some elbow grease, but the next step is to deep clean your storage unit. The goal here is to get rid of dust, dirt, cobwebs, and other debris on your possessions, on the flooring, and walls of the storage unit.
If you have a rented storage space, be sure to find out what cleaners, if any are allowed in the facility. Some facilities may ban cleaners with harsh chemicals like bleach or ammonia. If this is the case, make your own multi-purpose cleaner with water and a fragrance-free cleaning product.
You will need to use your approved cleaner to sanitize the interior of the storage unit. That means cleaning the floors, and walls, in addition to your possessions. Wipe down any shelving in the storage unit, and wipe down any plastic storage bins as well. Give any furniture a glance to inspect for mold or mildew growth.
If there are any upholstered pieces of furniture or mattresses that have mold growth, it should be dealt with ASAP! The contaminated piece of furniture should be removed immediately, and cleaned by a professional if you want to try to save it. To prevent mold accumulation, store your items in vacuum-sealed bags or airtight plastic bins. To keep your unit relativity clean, store your approved cleaning products inside the unit. This way, you can return every so often to wipe down surfaces, floors, and walls.
Third Step: Focus on Creating an Efficient Layout
This is the time to create an efficient layout inside the storage unit. With all of your possessions still outside of the space, allow the interior of the storage unit to dry out after the deep clean. During this time, take your inventory list and use it to figure out where everything should go, this is going to allow easier access to your items.
First, divide your possessions into categories to help things stay organized. These categories can include seasonal clothing and items, important documents, kitchen items, toys, and children’s items.
Then, label all of your boxes, and plastic storage bins so that you know what is being stored in what, as this will help you stay organized. You may want to purchase additional shelving to help stay organized. And, shelving keeps your items off the floor which prevents damage.
If you are storing a lot of seasonal clothing, it might help to have a clothing rack to hang them up. To further protect your clothing, consider using plastic garment bags to place your possessions in, as plastic bags prevent mold from forming.
So, to recap, divide items into categories, label everything, and try to use shelving or a clothing rack to keep your things off the floor.
Fourth Step: Arrange Your Items According to Your New Layout to clean up your storage space
The last step is to arrange the storage unit based on the layout you designed. As you arrange the shelving, storage bins and boxes, and clothing racks, make sure to leave enough room to walk around in the unit. Try to leave space for future items that you may need to store.
Then, place your stuff inside the storage unit based on size, weight, and easy access to the things you know you will need most. Any furniture or mattresses and other bigger items can be placed in the back of the unit. Place the shelves in front for easier access to items, and stack the boxes and bins accordingly.
Remember, if you want to take good care of your stored possessions, you should return to clean, declutter, and organize every now and then. Keep your cleaning supplies stored inside of your storage unit so you will be ready to go when deep cleaning time arrives.
Learn more from our Quick Guide To Self Storage.
Clean up your storage space and get organized!